How to Use Apache Zeppelin with SnappyData
Step 1: Download, Install and Configure SnappyData
-
Download and Install SnappyData The table below lists the version of the SnappyData Zeppelin Interpreter and Apache Zeppelin Installer for the supported SnappyData Releases.
SnappyData Zeppelin Interpreter Apache Zeppelin Binary Package SnappyData Release Version 0.7.3.5 Version 0.7.3 Release 1.1.0 Version 0.7.3.4 Version 0.7.3 Release 1.0.2.1 Version 0.7.3.2 Version 0.7.3 Release 1.0.2 Version 0.7.3 Version 0.7.3 Release 1.0.1 Version 0.7.2 Version 0.7.2 Release 1.0.0 -
In lead node configuration set the following properties:
-
Enable the SnappyData Zeppelin interpreter by adding
-zeppelin.interpreter.enable=true -
In the classpath option, define the location where the SnappyData Interpreter is downloaded by adding
-classpath=/<download_location>/snappydata-zeppelin-<version_number>.jar -
In the conf/spark-env.sh file, set the
SPARK_PUBLIC_DNSproperty to the public DNS name of the lead node. This enables the Member Logs to be displayed correctly to users accessing the SnappyData Monitoring Console from outside the network.
-
-
Extract the contents of the Zeppelin binary package.
-
Install the SnappyData Zeppelin interpreter in Apache Zeppelin by executing the following command from Zeppelin's bin directory:
./install-interpreter.sh --name snappydata --artifact io.snappydata:snappydata-zeppelin:<snappydata_interpreter_version_number>Zeppelin interpreter allows the SnappyData interpreter to be plugged into Zeppelin using which, you can run queries.
-
Rename the zeppelin-site.xml.template file (located in zeppelin-<version_number>-bin-all/conf directory) to zeppelin-site.xml.
-
Edit the zeppelin-site.xml file:
In the
zeppelin.interpretersproperty, add the following interpreter class names:org.apache.zeppelin.interpreter.SnappyDataZeppelinInterpreter,org.apache.zeppelin.interpreter.SnappyDataSqlZeppelinInterpreter -
Download the predefined SnappyData notebooks notebook.tar.gz. Extract and copy the contents of the notebook.tar.gz compressed file to the notebook folder in the Zeppelin installation on your local machine.
-
Start the Zeppelin daemon using the command:
bin/zeppelin-daemon.sh start -
To ensure that the installation is successful, log into the Zeppelin UI (http://localhost:8080) from your web browser.
Step 2: Configure Interpreter Settings
-
Log on to Zeppelin from your web browser and select Interpreter from the Settings option.
-
Click Create to add an interpreter.

-
From the Interpreter group drop-down select snappydata.
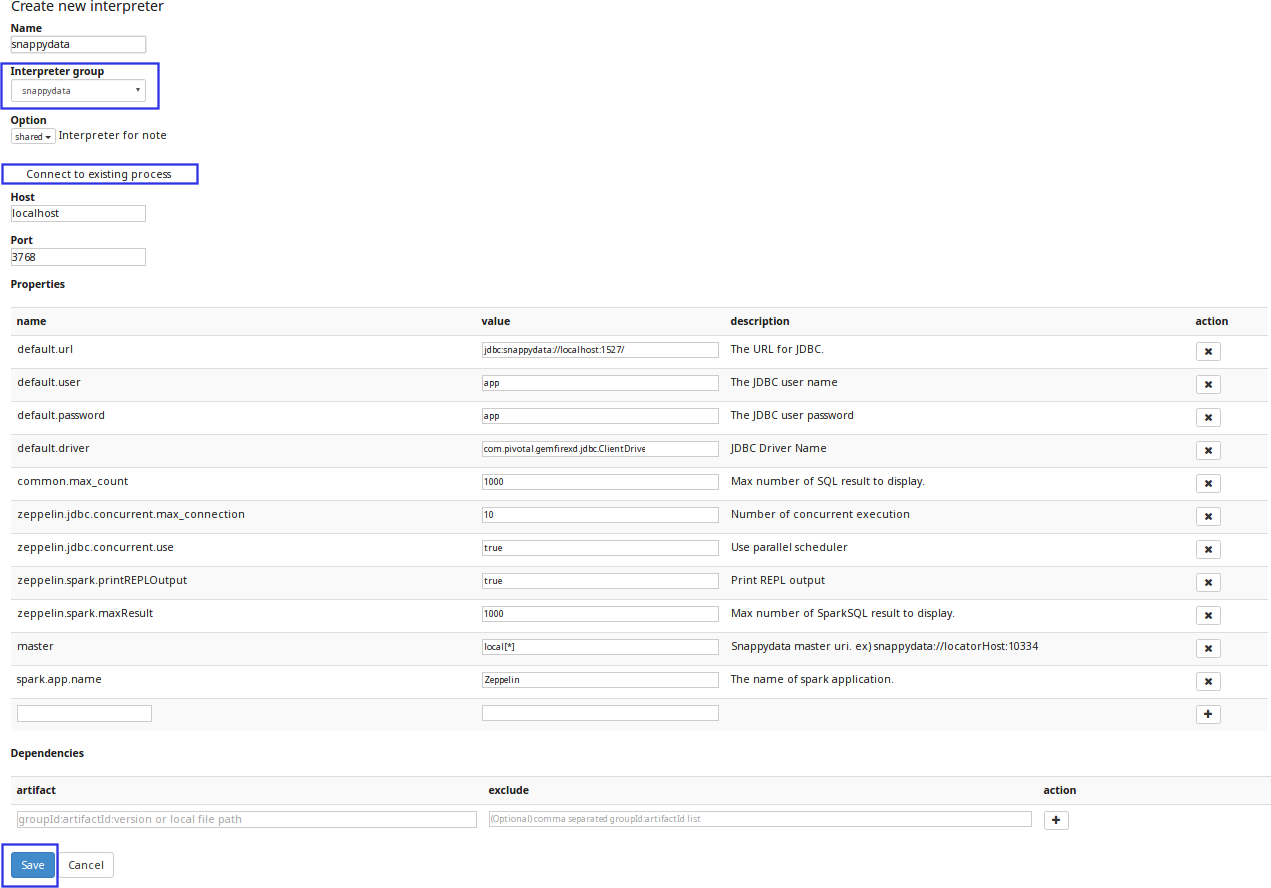
Note
If snappydata is not displayed in the Interpreter group drop-down list, try the following options, and then restart Zeppelin daemon:
-
Delete the interpreter.json file located in the conf directory (in the Zeppelin home directory).
-
Delete the zeppelin-spark_<version_number>.jar file located in the interpreter/snappydata directory (in the Zeppelin home directory).
-
-
Click the Connect to existing process option. The fields Host and Port are displayed.
-
Specify the host on which the SnappyData lead node is executing, and the SnappyData Zeppelin Port (Default is 3768).
Property Default Values Description Host localhost Specify host on which the SnappyData lead node is executing Port 3768 Specify the Zeppelin server port -
Configure the interpreter properties. The table lists the properties required for SnappyData.
Property Value Description default.url jdbc:snappydata://localhost:1527/ Specify the JDBC URL for SnappyData cluster in the format jdbc:snappydata://<locator_hostname>:1527default.driver io.snappydata.jdbc.ClientDriver Specify the JDBC driver for SnappyData snappydata.connection localhost:1527 Specify the host:clientPortcombination of the locator for the JDBC connectionmaster local[*] Specify the URI of the spark master (only local/split mode) zeppelin.jdbc.concurrent.use true Specify the Zeppelin scheduler to be used. Select True for Fair and False for FIFO -
If required, edit other properties, and then click Save to apply your changes.
Note
You can modify the default port number of the Zeppelin interpreter by setting the property:
-zeppelin.interpreter.port=<port_number> in lead node configuration.
Additional Settings
-
Create a note and bind the interpreter by setting SnappyData as the default interpreter. SnappyData Zeppelin Interpreter group consist of two interpreters. Click and drag <Interpreter_Name> to the top of the list to set it as the default interpreter.
Interpreter Name Description %snappydata.snappydata or %snappydata.spark This interpreter is used to write Scala code in the paragraph. SnappyContext is injected in this interpreter and can be accessed using variable snc %snappydata.sql This interpreter is used to execute SQL queries on the SnappyData cluster. It also has features of executing approximate queries on the SnappyData cluster. -
Click Save to apply your changes.
If you are using SnappyData Zeppelin Interpreter 0.7.1 and Zeppelin Installer 0.7 with SnappyData 0.8 or future releases, the approximate result does not work on the sample table, when you execute a paragraph with the %sql show-instant-results-first directive.